Listen to the AI podcast version of this article.
AWS Best Practices: 3-Tier Infrastructure
The three-tier architecture pattern has been an established best practice for decades. By separating infrastructure into layers, each is inherently more secure and flexible. In the cloud, the same design principles apply. This article focuses on the core principles of the three-tier web application architecture pattern on AWS, including availability zones, load balancers, route tables, gateways, autoscaling groups, and databases.
AWS regularly introduces new services and features that enhance the capabilities of the three-tier architecture. Stay informed on the latest updates here.
Breaking Down the AWS 3-Tier Architecture: Understanding Each Tier's Role
The three-tier architecture pattern is a common infrastructure design that divides the infrastructure into three layers: one public and two private layers. The public layer acts as a shield to the private layers, which are only accessible from within the network.
Beyond this separation, achieving high availability is crucial. AWS enables high availability by distributing your application across multiple availability zones—each representing a distinct physical data center in a different geographic region, ensuring enhanced resilience and uptime.
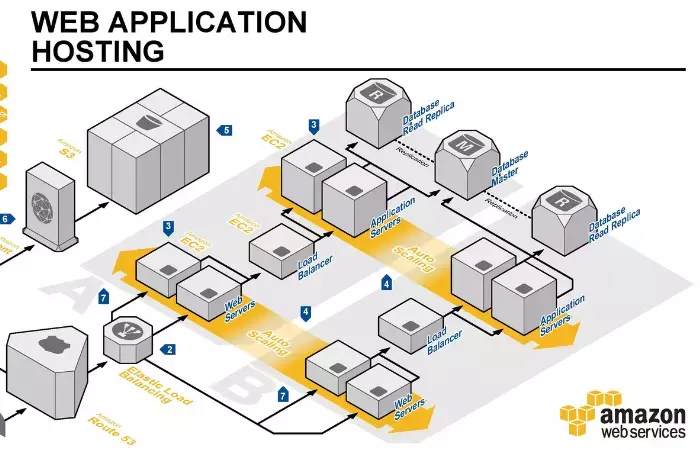
Basic 3-Tier AWS Web Application Components
According to the AWS Well-Architected pillars, we split our network across three availability zones, which gives us high availability and redundancy. If one of the availability zones is unavailable for whatever reason, our application would not be affected as traffic would flow to the other two availability zones.
In order to split our network into 3 tiers and across 3 availability zones, we create the following subnets (see image 1 below):
- Public Layer: Consists of 3 public subnets, one on each availability zone.
- Application Layer: Consists of 3 private subnets, one on each availability zone.
- Database Layer: Also consists of 3 private subnets, one on each availability zone.

Image 1: Basic structure of the AWS 3-tier infrastructure with public, application, and database layers across three availability zones.
Private vs Public Subnets
What's the difference between a public subnet and a private subnet?
The main feature that makes a subnet "public" or "private" is how instances in that subnet access the internet. A public subnet allows its instances to access the internet via an Internet Gateway. A private subnet, on the other hand, allows its instances to access the internet via either a Network Address Translation server (NAT) or via Amazon's managed NAT service (NAT Gateway). In this example, we’ve chosen Amazon’s NAT Gateway for its ease of management and scalability.
In order to make a subnet allow access to the internet via an Internet Gateway or a NAT Gateway, you have to make sure that the route tables for the subnet are set up in a way to direct traffic to the correct gateway. In our example we set the following route tables:
Public Subnets
10.0.0.0/24 -> local
0.0.0.0/0 -> internet-gateway-id
Private Subnets
10.0.0.0/24 -> local
0.0.0.0/0 -> NAT-gateway-id
Image 2 below shows the route tables for both the public and the private subnets.
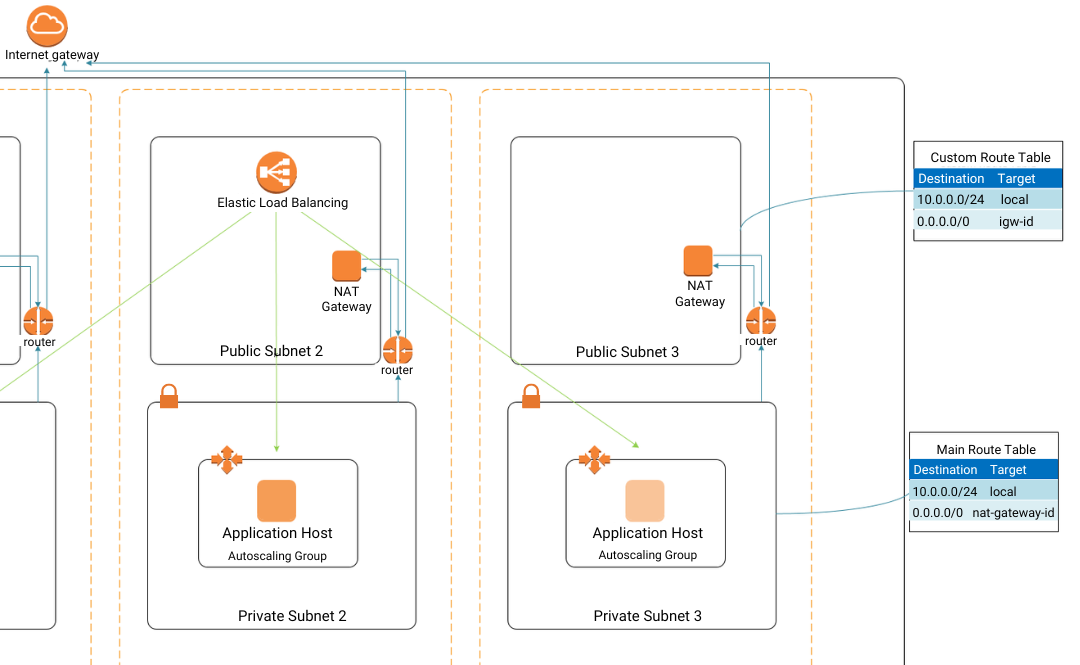
Image 2: Public and private subnet accessibility is set via route tables for Internet Gateway (igw-id) or NAT Gateway.
What goes in each of the layers?
Public Layer
The public (top) layer will host an internet-facing Elastic Load Balancer (ELB) and a Bastion host. The ELB is the entry point for your application and it directs traffic to your application servers. Note that the ELB needs to be available in all three availability zones. This will allow for high availability and redundancy, in case something happens to an entire availability zone. Our diagram only shows one instance of the ELB and you will only see one instance in the AWS console. However, behind the scenes AWS provisions multiple instances of the ELB based on what availability zones have EC2 instances behind that load balancer.
The Bastion host (also known as Jump host) is the server that will allow you to connect to your application servers (or any other servers in the private subnets) via SSH.
Application Layer
The second layer is the application layer, this is where your application servers live. In our case we wrap our application server with an Autoscaling Group. This allows our application to scale up if more servers are needed or to recover in the case one of the availability zones is out of service. In the case where an entire availability zone is out of service, the load balancer is smart enough to know that and will scale up in a different availability zone.
Database Layer
The third and last layer is the database layer. This is where the databases live. The only way to access these databases is by connecting to them from the application layer.
In this case we used Amazon's Relational Database Service (RDS), which is a managed database service provided by Amazon. One advantage of using RDS is that we can have a failover database instance in a separate availability zone. In addition, we can also have one or more read-only RDS instances to take some of the load of the main database.

Image 3: Components in each layer of the 3-tier infrastructure. The public layer includes an Elastic Load Balancer (for high availability and redundancy), the application layer utilizes autosclaing groups (for scalability), and the database layers uses Amazon RDS, a managed database service.
Benefits of the 3-Tier Architecture
"Failures are inevitable; design for recovery." - Werner Vogels, CTO of Amazon
The AWS three-tier network architecture remains a gold standard for building scalable, secure, and resilient applications in the cloud. By adopting this architecture, businesses can compartmentalize their infrastructure, ensuring that each layer is optimized for its specific function—whether it's handling user interactions, processing business logic, or securely managing data.
Scalability and Flexibility
One of the primary benefits of the three-tier architecture is its inherent scalability. Each tier can be scaled independently based on demand, allowing your application to grow seamlessly as your user base expands. AWS services such as Auto Scaling Groups, Elastic Load Balancers, and RDS Multi-AZ deployments ensure that your infrastructure remains responsive and available, even under heavy load.
Security and Compliance
Security is embedded into every layer of the three-tier architecture, from public-facing web servers to back-end databases. AWS provides a comprehensive suite of security tools—like AWS Shield, WAF, VPC Endpoints, and AWS Firewall Manager—to help you protect your infrastructure against evolving threats. Moreover, by isolating resources within VPCs and using features like NAT Gateways and Egress-Only Internet Gateways, you can maintain strict control over data flow, ensuring compliance with industry regulations.
Innovation and Future-Proofing
The continuous evolution of AWS services, such as the introduction of CloudShell, Network Load Balancers, and IP Address Manager, means that your three-tier network architecture can adapt to new challenges and opportunities as they arise. These tools not only enhance performance and security but also simplify management, making it easier to maintain and optimize your infrastructure over time.
Read about the latest services available to enhance your AWS 3-tier architecture >>
Conclusion
Whether you’re running an e-commerce platform, a financial services application, or a healthcare system, the AWS three-tier architecture provides a robust foundation that can be tailored to meet your specific needs. By leveraging these best practices, you can build an infrastructure that is not only reliable and efficient but also capable of supporting your organization’s growth and innovation in the years to come.
More on AWS best practices:
- Tagging Best Practices
- Security Essentials for AWS
- What Constitutes A Successful DevOps Strategy
- DevSecOps: When DevOps Meets Security
At Stratus10, we specialize in designing and implementing AWS architectures that align with your business goals. By following AWS best practices and incorporating the latest features, we help you build an infrastructure that is secure, scalable, and ready for the future. Whether you’re looking to enhance your existing setup or start from scratch, the three-tier architecture is a proven approach that delivers results.
For more detailed info on AWS infrastructure setup, read Amazon's white paper on architecture best practices.
Recent Posts


Newsletter Sign Up
AWS Cost Intelligence & Security Compliance Platform
As an AWS partner with years of expertise in designing and managing cloud infrastructure, we created Kalos, an innovative cloud management platform. Kalos simplifies the way you monitor and manage your AWS costs, security, and performance, ensuring best practices while delivering actionable insights.
See how Kalos can transform your AWS cloud operations.
About Stratus10
We help companies migrate their infrastructure and applications to the cloud and implement best practices for continuous innovation. We specialize in migration, DevOps automation, and cloud optimization to help clients take advantage of the latest services AWS has to offer.
Follow us for more tips and best AWS practices!
![]()
![]()
![]()
![]()