No Servers Needed: Host a Static Website with Amazon S3 and CloudFront
Hosting a website typically requires having a server to host it on, and if you need your website to handle a lot of traffic you will need multiple servers. However, if you have a static HTML website that does not require any data storage or dynamic content you can host it on Amazon S3 without having to pay for, or worry about, having any servers. In addition, you can use AWS’ Content Delivery Network, CloudFront, to make sure your website can handle a lot of traffic.
In this article we will show you how to host a static HTML website on S3, use AWS CloudFront to serve it to your users, and set up DNS using Route53.
What is Amazon S3?
Amazon Simple Storage Service (S3) is an AWS service that allows you to store files or objects. Objects uploaded to S3 are redundantly stored across multiple Availability Zones. S3 is designed to deliver 99.99% durability which means your files will always be available. In addition, S3 also has built-in functionality to host static websites.
What is CloudFront?
CloudFront is Amazon's Content Delivery Network (CDN). It allows you to distribute content (in this case website files) through a worldwide network of datacenters called edge locations.
Typically, when a user types in a website URL on their browser the browser sends a request to the server where the website lives. In turn, the web server returns the files needed to display the website on the user's browser. The problem with this is that the web server may be thousands of miles away from the user which will make loading the website a slow process since the files have to travel all the way from the web server to the user's computer over the internet.
In contrast, when you use CloudFront to deliver you website, CloudFront makes a copy of the website files from the server and puts them in an edge location that is very close to the user. This speeds up the website loading time as the files get loaded from a location much closer to the user. In addition, serving your website files from an edge location reduces the load on the web server and allows you to handle higher traffic loads.
Note: We will make this process even better by hosting our website on S3.
What is Route53?
Route53 is Amazon's highly-scalable Domain Name System (DNS). You can use Route53 to register domain names and to route internet traffic to your resources. In this tutorial we will use Route53 to direct traffic to our CloudFront website distribution.
S3 Set Up
1. Create an Amazon S3 bucket
Log into the AWS console, go to the Amazon S3 page, and click on the "Create bucket" button. Type a bucket name (preferably the domain for your site) and select a region. Click Next.

2. Set permissions
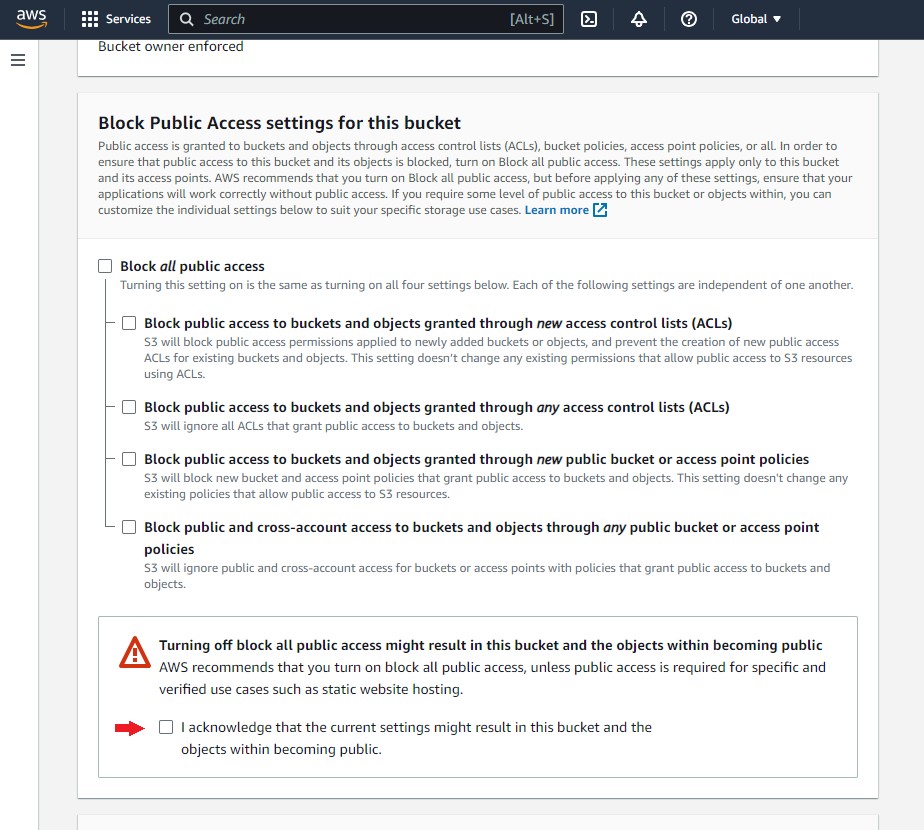
Scroll down and uncheck the “Block all public access” checkbox.
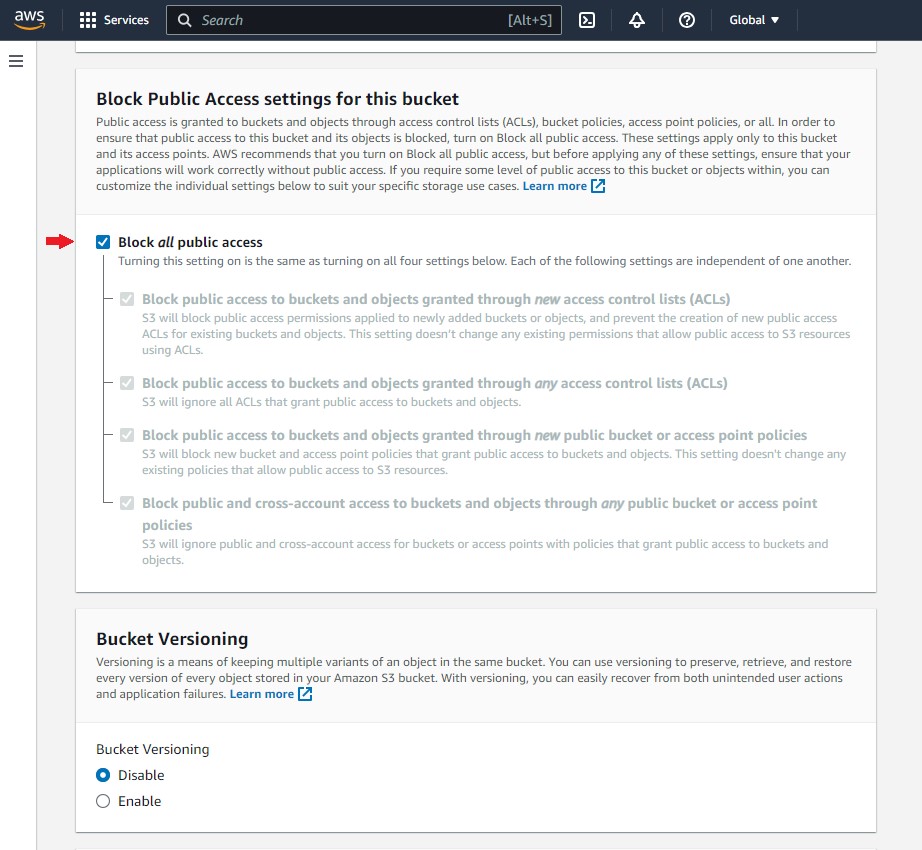
Then check the acknowledgement box that objects in the bucket will become public.
Scroll down and click "Create bucket."
Note: If you don't want people to access your website directly from S3 you will have to create an Origin Access Identity, see AWS documentation for more details.
3. Upload website files
Once your bucket is created you can upload all your website files to the bucket by going into the bucket and clicking the "Upload" button at the top of the screen.
4. Configure Amazon S3 bucket to serve your site
Now that your website files are uploaded to S3 you will need to configure the bucket to serve your static website. Go into the bucket by clicking the bucket name from the list, and then click on the "Static Website Hosting" box.

Select "Enable static website hosting." Additional options show up when you click “Enable”. Scroll down and click “Save changes.”

CloudFront Set Up
Now that you've set up S3 to host your static site we need to configure CloudFront to serve your website from the CDN. Open up the CloudFront page by going to https://console.aws.amazon.com/cloudfront and click on the "Create Distribution" button.

CloudFront allows you to create 2 types of distributions, a Web distribution to serve a website and an RTMP distribution for streaming media files. In our example we will create a Web distribution.
There are a lot of different ways to set up a Web distribution in CloudFront and there are several different settings on the form to create a distribution. We will cover the basic ones needed to get our website up and running. If you want more information on each of the fields click on the icon next to each field.
Fill out the distribution form as follows:
- Origin Domain Name: This is the origin of your website, in our case, an Amazon S3 bucket. Click on the "Origin Domain Name" field and select the Amazon S3 bucket that contains your website.

- Origin Pattern: This is the default caching pattern. It is set to (*) which means these rules will apply to every object on the website. You can set up caching rules for specific paths (like /images) after you create your initial distribution.
- Viewer Protocol Policy: How do you want viewers to access your website? over HTTP or HTTPS (if you have a certificate) or both. Beware that if you include HTTPS you will need to have a certificate set up.
- Allowed HTTP Methods: which HTTP methods does your website support and which do you want to cache by default? Depending on what your website does you may or may not need all HTTP methods.
- Cache key and origin requests: Does your website provide caching headers or do you want CloudFront to handle caching headers? If you want to handle caching through CloudFront you can select the policies here and adjust them as needed.

- Price Class: Pick the edge locations from which you want CloudFront to serve your website. You should base this on your users' geographical location.
- Alternate Domain Names: This is the domain name for your website.
- SSL Certificate: If you want your viewers to access your website over a secured connection you will need an SSL certificate. We recommend you create an SSL certificate using your domain name and use it. Using an SSL certificate created by CloudFront will generate a warning when accessing your site as the domain name on the certificate will be different than the domain name for your website.
- Default Root Object: This is the index file for your site (i.e., index.html)
- Comment: This is the name you want to give to this distribution.
- Distribution State: You can set this to 'Enabled' if you want to deploy the distribution right away or 'Disabled' if you rather do it later.
When ready click "Create Distribution". It may take several minutes for the distribution to be created. In the meantime we can set up DNS using Route53.
Route53 (DNS) Set Up
1. Create a Hosted Zone
The first thing you need to do is create a hosted zone for your domain. Open the Route53 page by going to https://console.aws.amazon.com/route53/home and select the "Create Hosted Zones" box and click “Get Started”. You will see a form for the new hosted zone. Fill out the form and click "Create hosted zone".
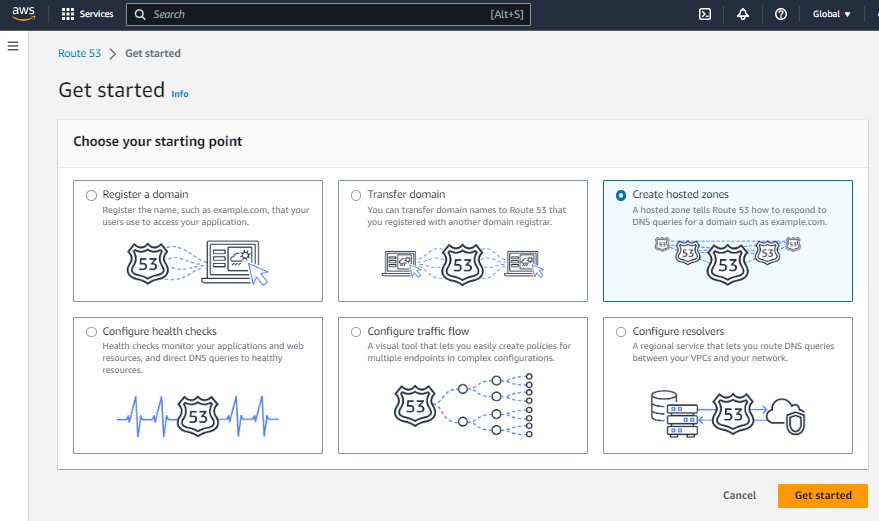
Make sure the Type is set to "Public hosted zone".

2. Create an 'A' Record Set
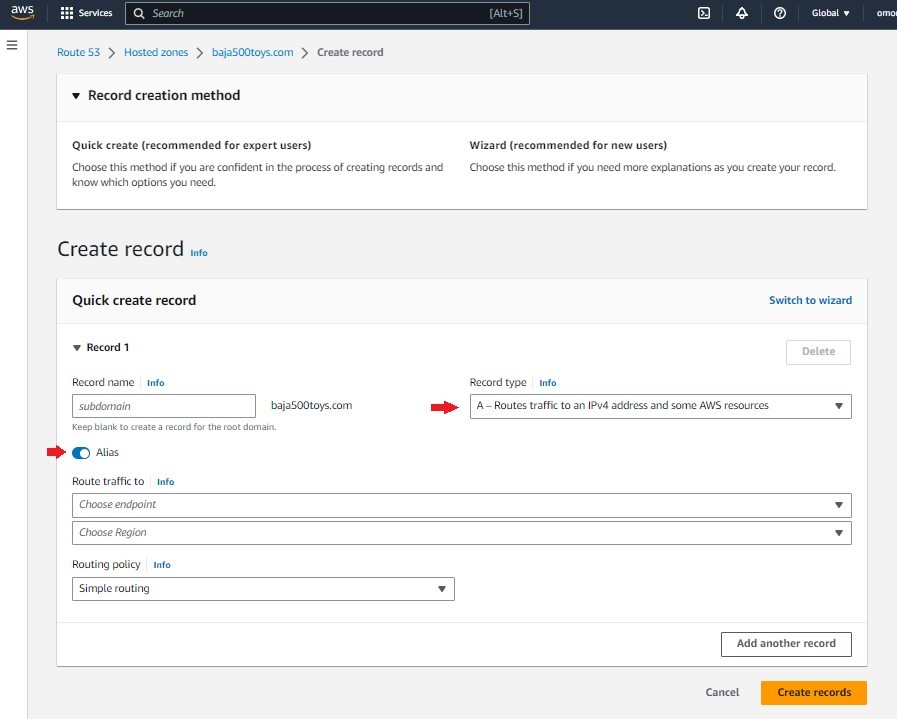
The next step is to create an 'A' record for your domain. Click on the hosted zone you just created and then click on "Create Record". A form will appear on the next screen. Fill it out as follows:
- Name: Leave blank. (You need to leave this field blank as this record is for your top-level domain)
- Type: Select "A - IPv4 address"
- Alias: Make sure Alias is set to 'Yes' as this is for your top-level domain.
- Alias Target: Select the CloudFront distribution you created for your website.
Conclusion
This set up will allow you to host a static HTML website on Amazon S3 and serve it using AWS CloudFront. Technically this is an "infinitely" scalable set up and its only limitation is the bandwidth that Amazon's infrastructure can handle.
Another advantage of this set up is the fact that it saves you money on servers. You don't have to worry about maintaining servers or scaling them to handle increased traffic.
Our Stratus10 team has over 35 years of combined experience with web hosting and infrastructure design. Click here to send us a note and see how our team can help you optimize your AWS infrastructure.
Get in touch with a cloud expert today to discuss how Stratus10 can help!
Call us at 619.780.6100
Send us an email at sales@stratus10.com
Send us a message by filling out our contact form
Read our customer case studies